Mastering Cryptography Fundamentals with Node’s crypto module
Do you know that meme of Homer Simpson trying to hide in the bushes? That's how I used to feel when my coworkers would discuss asymmetric encryption, certificate signing, salting, and scary-sounding acronyms like PBKDF2. After years of trying to ignore this problem, I decided to study up on modern Cryptography via books and online videos. However it was important to me to see how the concepts and algorithms I was learning can be applied in real-world applications using Javascript. Thankfully Node.js has a built-in module for cryptographic operations called the crypto module which is quite extensive. So I dug into the crypto module and examined how it can be used to put the principles I was learning into practice.
This post covers the fundamentals of Cryptography and shows how to put them to use with Node.js' crypto module.
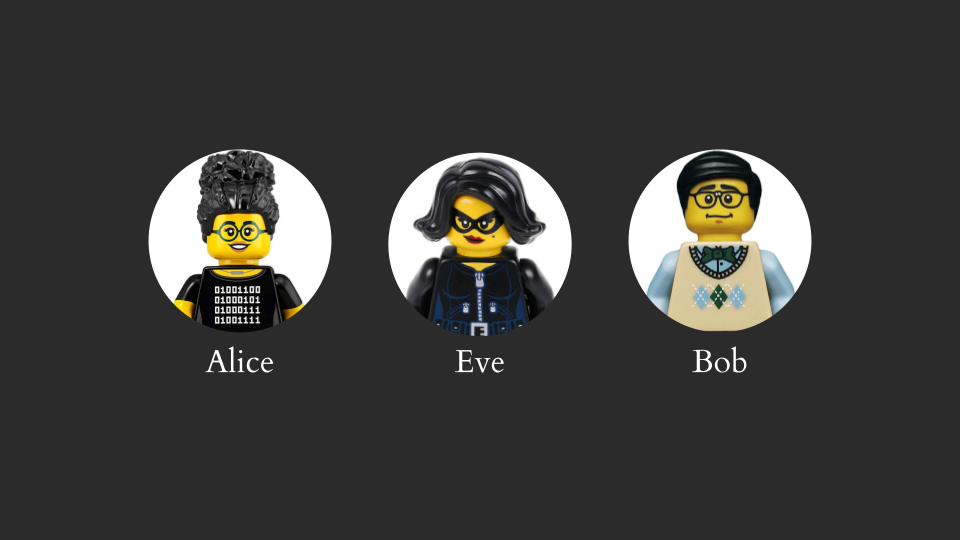
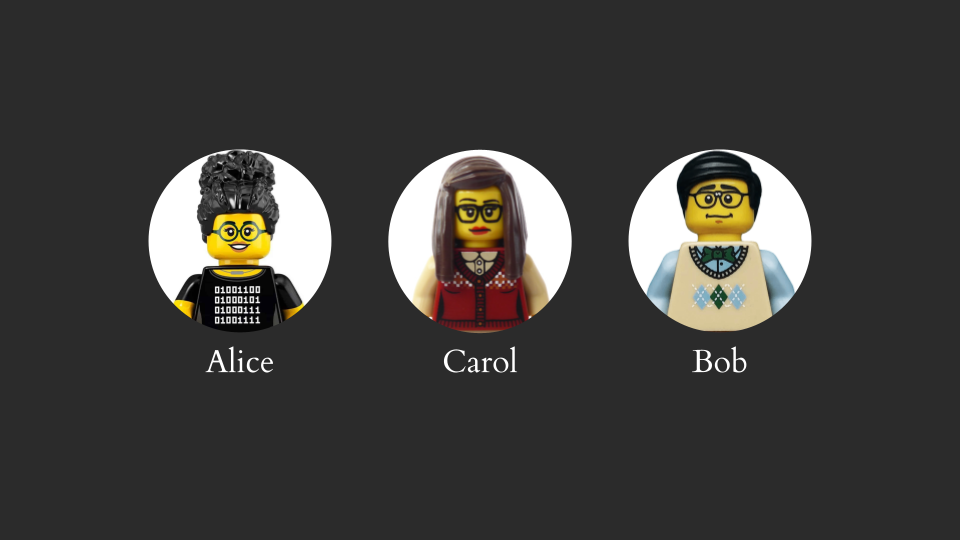
Meet Alice and Bob. They're going to help out through our journey. Alice and Bob want to communicate securely, but they know that Eve wants to intercept or tamper with their correspondence.
Encryption 🔒
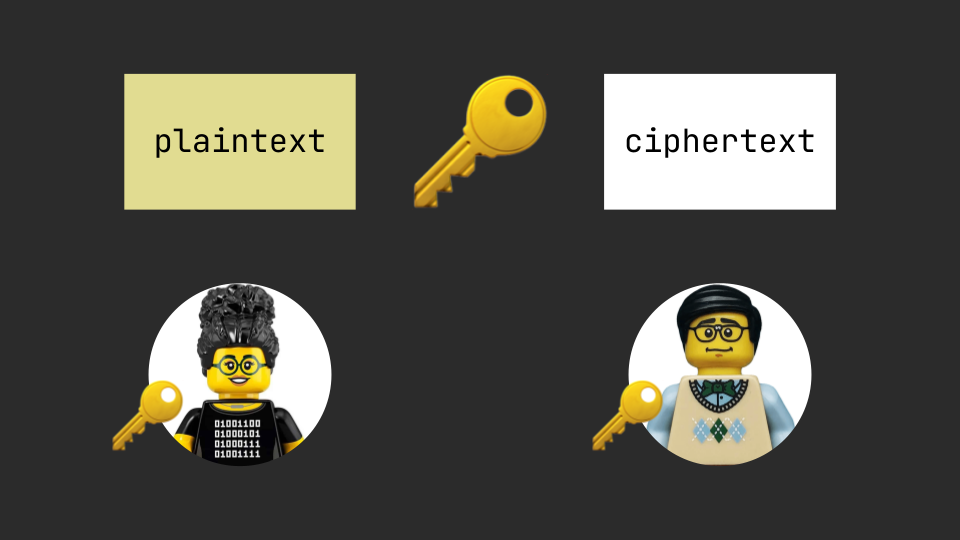
Let's start with Encryption! Alice wants to send Bob a message, so she will scramble the plaintext (original message) to a ciphertext (encrypted message) that will be illegible to Eve. A shared key 🔑 known only to Alice and Bob allows to transform the plaintext to the ciphertext and vice-versa.
Choosing an Encryption Algorithm
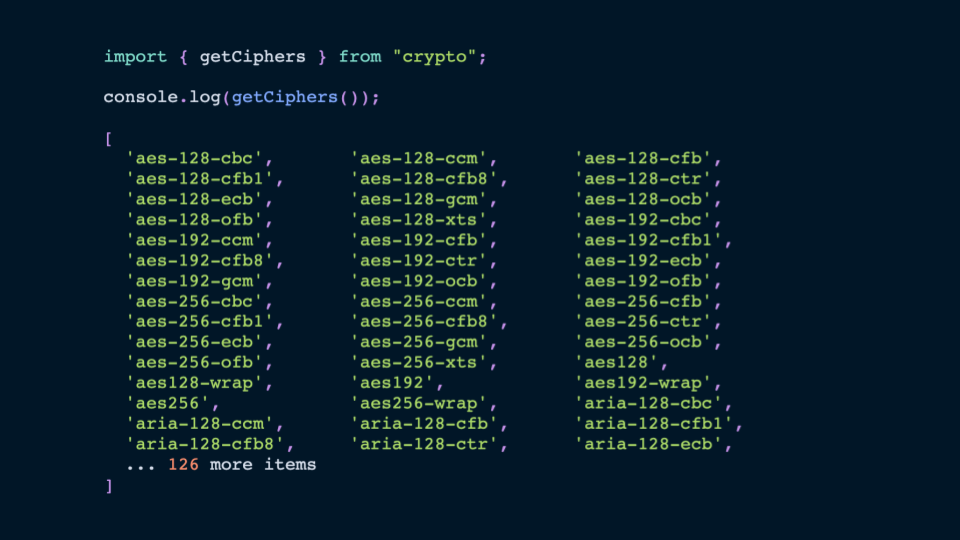
First Alice and Bob must choose a specific encryption algorithm to use. The crypto module's getCiphers function returns a list of the names of the supported cryptographic algorithms that are supported on your machine.
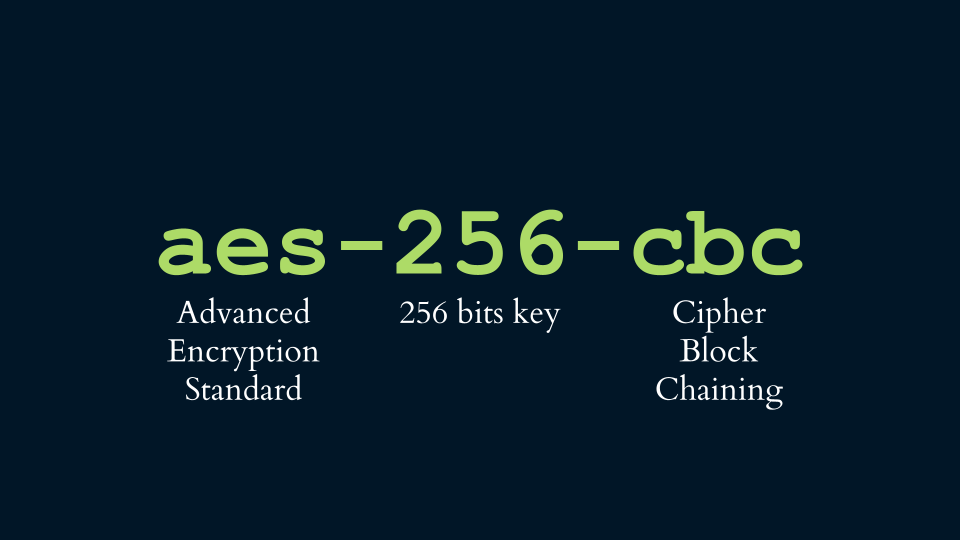
In this example Alice and Bob will choose to use the aes-256-cbc cipher. Let's break down what we can learn about this particular algorithm from its name:
aes: The "Advanced Encryption Standard." As the name suggests this is a widely used encryption standard.256This refers to the size of the key that will be used. In this case a 256 bits key. Generally speaking the longer the key is the more you'll be protected from brute-force attacks (where an attacker loops through all possible keys).cbcThis stands for "Cipher Block Chaining" which is a mode of encryption that works by splitting the plaintext into fixed-size "blocks". One of the things that makes this method secure is that it uses an Initialization Vector which we'll cover next.
Using an Initialization Vector
In classic encryption algorithms passing the same plaintext and key always yields the same ciphertext. This repetition is a potential exploit for attackers like Eve. To avoid this we add a random value called the Initialization Vector (IV) as an input to the encryption we'll use. Because this value will be different every time, the ciphertext will be different every time.
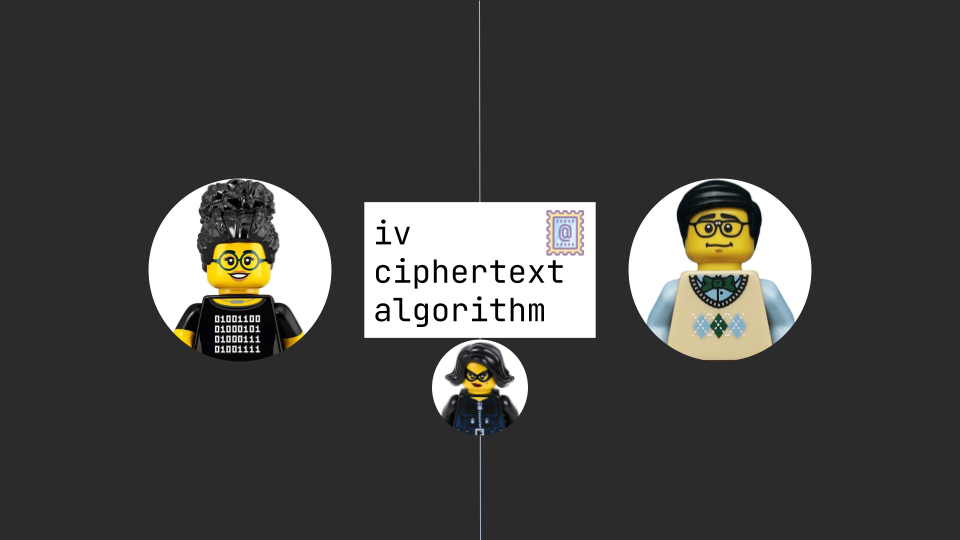
The Encryption and Decryption Process
Let's take a look at the encryption and decryption process:
- To encrypt Alice invokes the selected encryption algorithm with:
- The desired message (the plaintext)
- A generated random value as the IV
- The shared key (we'll discuss what value is used as the key and how it's shared later on)
- Alice transmits the ciphertext (the output of the encryption algorithm), the IV, and the chosen algorithm to Bob over the public channel. Even if Eve manages to get a hold on this data, she can't reverse the encryption since she doesn't have the key.
- Bob performs the decryption using the ciphertext, the IV, and his copy of the shared key (and Eve's snooping attempts are thwarted! 💪)
Use this slide component to see this process visualized:
Encryption \ Decryption with the crypto module
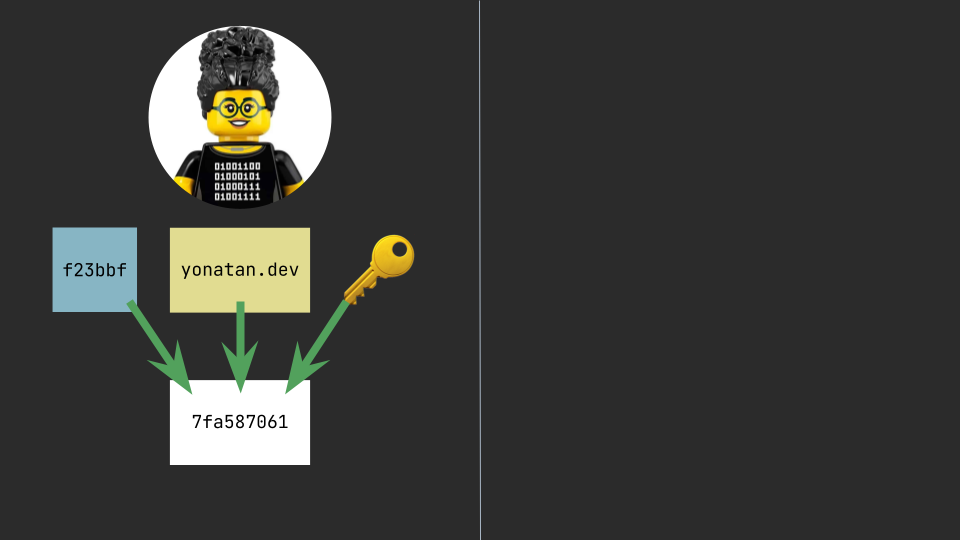
Let's take a look at Alice's Encryption code:
import crypto from "crypto";
import util from "util";
const randomBytes = util.promisify(crypto.randomBytes);

const algorithm = "aes-256-cbc";

// We always use Buffers with the crypto module
const plaintext = Buffer.from("yonatan.dev", "utf8");

// randomBytes let's us generate random data,
// but needs to be promisified
const iv = await randomBytes(16);

const key = loadKey();

const cipher = crypto.createCipheriv(algorithm, key, iv);

const ciphertext = Buffer.concat([
  // We have the option of composing the ciphertext in steps,
  // by calling update() several times
  cipher.update(plaintext),
  cipher.final(),
]);
And here's Bob's decryption code (notice how similar it is to Alice's encryption code):
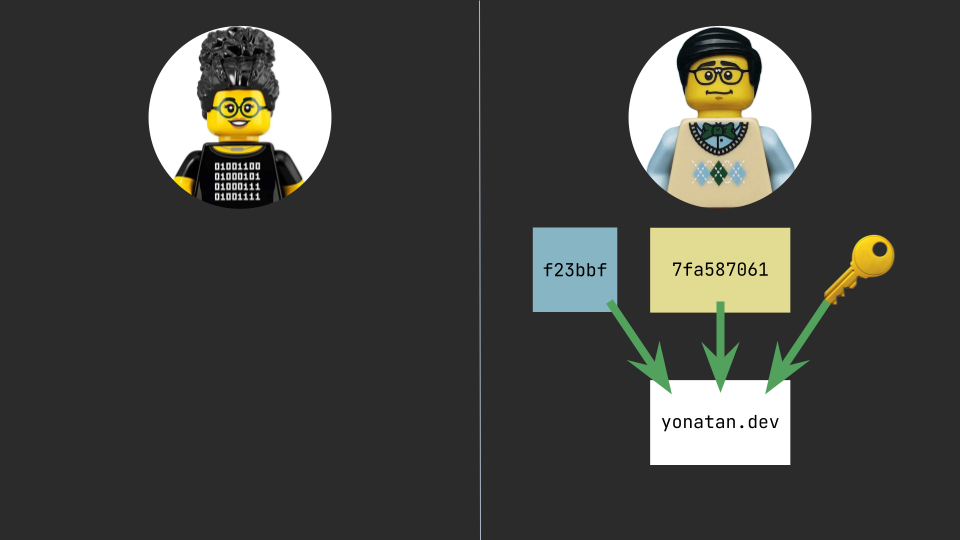
import crypto from "crypto";

function receive(iv, ciphertext, algorithm) {
  const key = loadKey();

  const decipher = crypto.createDecipheriv(algorithm, key, iv);

  const plaintext = Buffer.concat([
    decipher.update(ciphertext),
    decipher.final(),
  ]);

  console.log(plaintext.toString("utf8"));
  // yonatan.dev
}
Key Derivation Functions 🔑
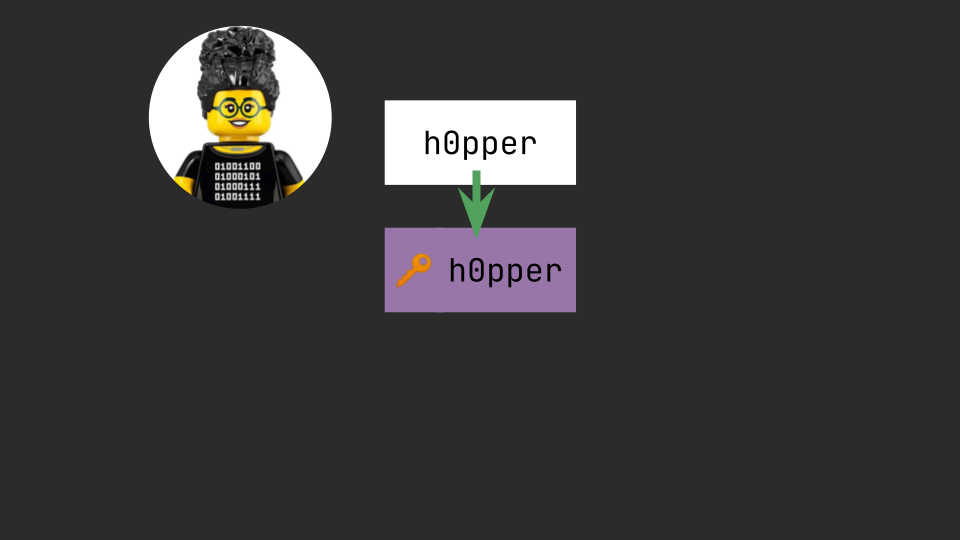
So far we've established that the confidentiality of the correspondence relies on the secrecy of the shared key. However, we've left the process somewhat vague regarding how to determine the value of the key. Alice and Bob might be tempted to use a human-memorable password they both can agree on and remember as their key, but this would ultimately give Eve an advantage. Let's understand why.
Low Entropy
The longer the key, the more challenging it becomes for an attacker to loop through and attempt all potential keys. However, when we confine ourselves to keys that are human-readable or memorable, we reduce the number of keys for the attacker to try. Keys derived from common words or easily guessable phrases are referred to as having low entropy. This low entropy means they contain less randomness, making them more vulnerable to brute force attacks.
Slow by design?
If we still want to use a human-memorable password as the basis of our security, we can derive a stronger key from a human's original password using a Key Derivation Function (KDF). KDFs are similar to hashing functions in that they are deterministic (given the same input they will always return the same output). But unlike normal hashing functions, KDFs are purposefully made to be slow! They are designed to be compute and memory intensive so that it will be ineffective for attackers like Eve to try to loop through potential passwords if they have to trigger the KDF on every iteration.
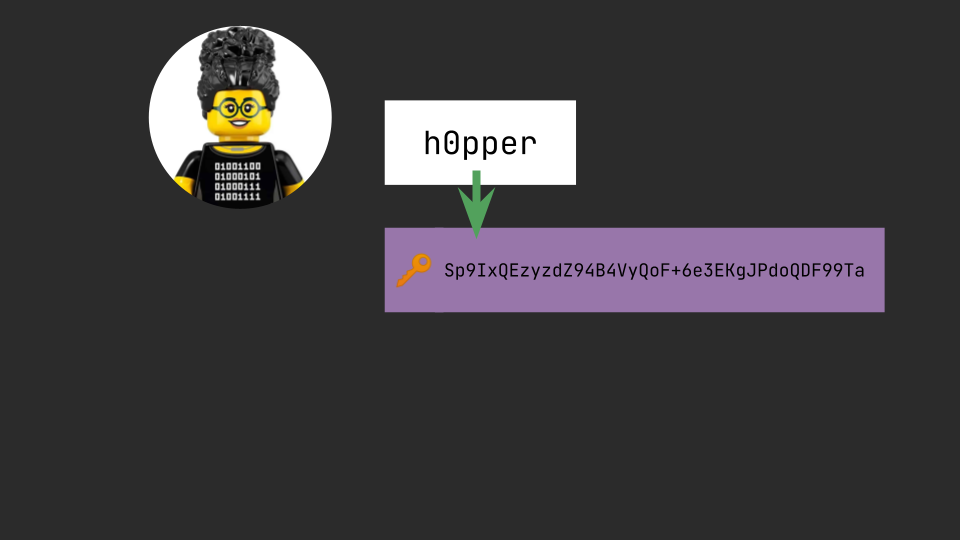
Protecting from pre-compute
Let's think of what Eve would have to do if she would like to find the key by assuming Alice and Bob use a common phrase as their password and then derive their key using a well-known KDF. We might assume Eve would find a pre-compiled list of common passwords, and for each one she would perform the costly task of applying the KDF to extract the potential key. But Eve is smarter than that! She would instead find a pre-computed list of common passwords already paired with their output values when passed through well-known KDFs! With this approach the addition of the KDF isn't slowing her down at all, and therefore negates its role in enhancing security.
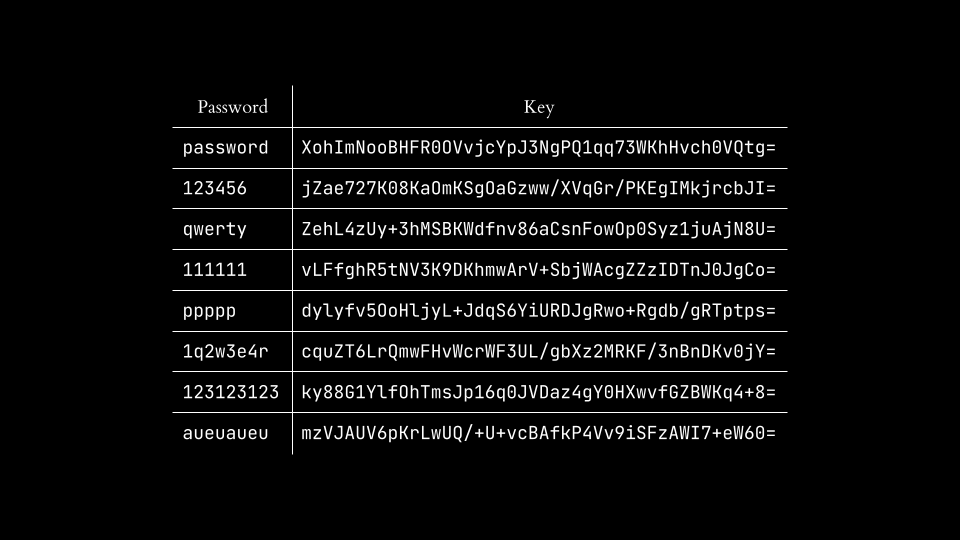
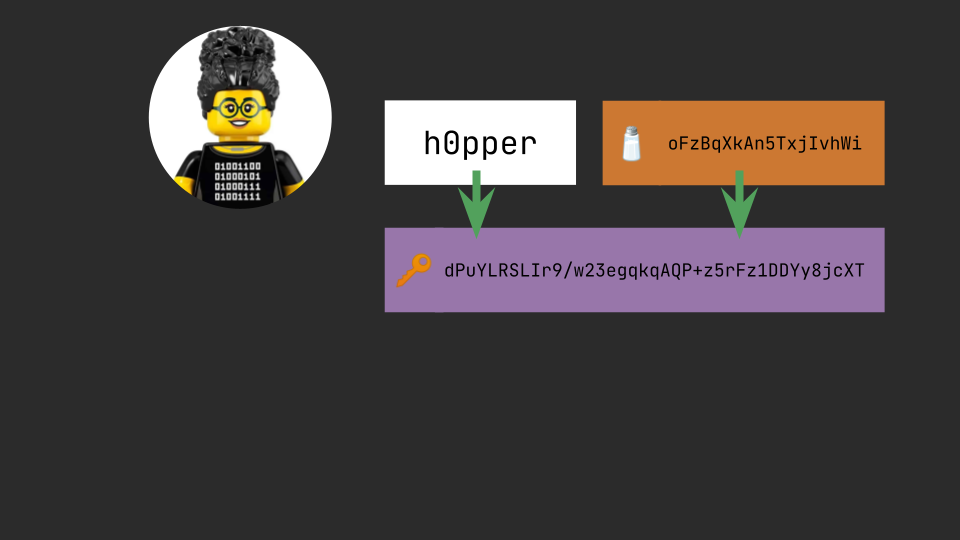
Salts to the rescue 🧂
Fortunately it's possible to upheld the effectiveness of KDFs and protect against pre-computation by adding a random value known as the "salt" to the key derivation process. Even if Eve has access to our salt, she would have to go through the costly process of calculating keys using common passwords and our unique salt.
Key Derivation Functions with the crypto module
Here's how to use the popular scrypt KDF to derive a key from a password (with the addition of a salt of course!)
import crypto from "crypto";
import util from "util";
const randomBytes = util.promisify(crypto.randomBytes);
const scrypt = util.promisify(crypto.scrypt);

const password = "qwerty";
const salt = await randomBytes(16);
const key = await scrypt(password, salt, 32);

console.log(`The key is: ${key}`);
The crypto module also includes other KDFs such as hkdf and pbkdf2.
Randomness 🔮
As you might have noticed so far, we rely on generating random values quite a lot when working with cryptographic algorithms. This means that we have to do our best to generate values that are are close as possible to truly random. If an attacker can predict or influence the values we choose it can give them a serious advantage. In Javascript we might be tempted to use the familiar Math.random() function to generate randomness, but this would be a mistake. As the MDN Docs state:
Math.random() does not provide cryptographically secure random numbers. Do not use them for anything related to security.So what can we use instead? The crypto modules has several methods for generating randomness:
import crypto from "crypto";
import util from "util";

const randomBytes = util.promisify(crypto.randomBytes);
const randomFill = util.promisify(crypto.randomFill);
const randomInt = util.promisify(crypto.randomInt);

// generate a new buffer of a given size and fill it with random data
const buffer1 = await randomBytes(4);
console.log(buffer1.toString("hex"));
// 82e2e97d

// fill an existing buffer (or subset of it) with random data
const buffer2 = Buffer.alloc(4);
await randomFill(buffer2, 2, 1);
console.log(buffer2.toString("hex"));
// 00003500

// generate a random integer within a certain range
const int = await randomInt(18, 180);
console.log(int);
// 137

// generate a random UUID
const uuid = crypto.randomUUID();
console.log("uuid", uuid);
// 0748d0c6-3641-4858-876e-ec8420ba261d
Key Distribution Problem 🤔
If we consider again the encryption process outlined above, Alice and Bob must exchange a shared key known only to them. But does this mean that Alice and Bob must meet in person? What happens if they live far apart? Is there a way for them to establish the key online and still maintain its secrecy? This was known as the Key Distribution Problem.
Luckily in the 1970s significant breakthroughs were made in solving the Key Distribution Problem. At Stanford, researchers Diffie, Hellman, and Merkle introduced the Diffie-Hellman Key Exchange, while at MIT, Rivest, Shamir, and Adleman published the RSA method. Let's take a look at how their work enabled distant parties like Alice and Bob to communicate securely without the need to physically exchange keys.

Diffie-Hellman key exchange
The Diffie-Hellman key exchange achieves something that seems intuitively impossible. Alice and Bob exchange information completely in the open, and yet manage to produce a key known only to both of them. To clarify how this can even be possible, a paint mixing analogy is often used. These videos do a good job at illustrating this analogy and explaining some of the math behind the protocol.
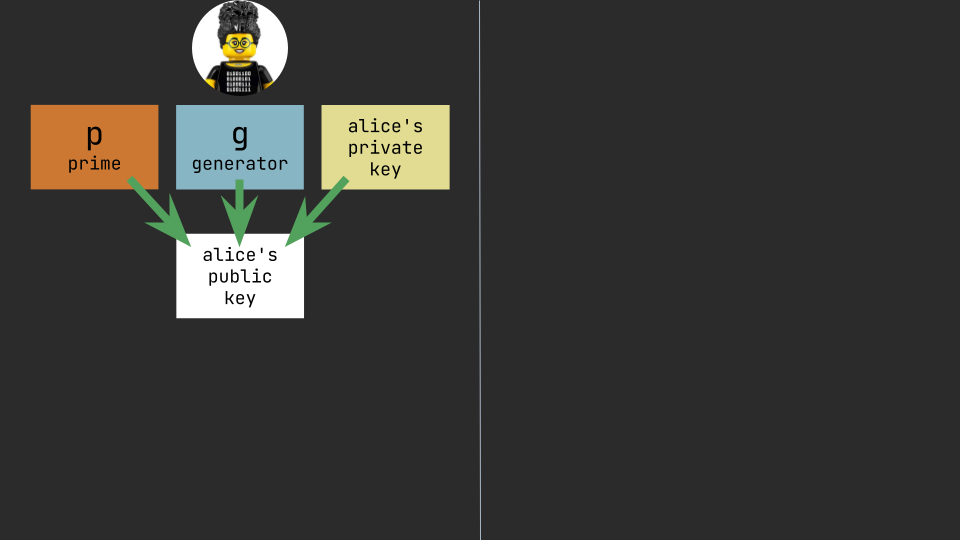
Let's review the key exchange process:
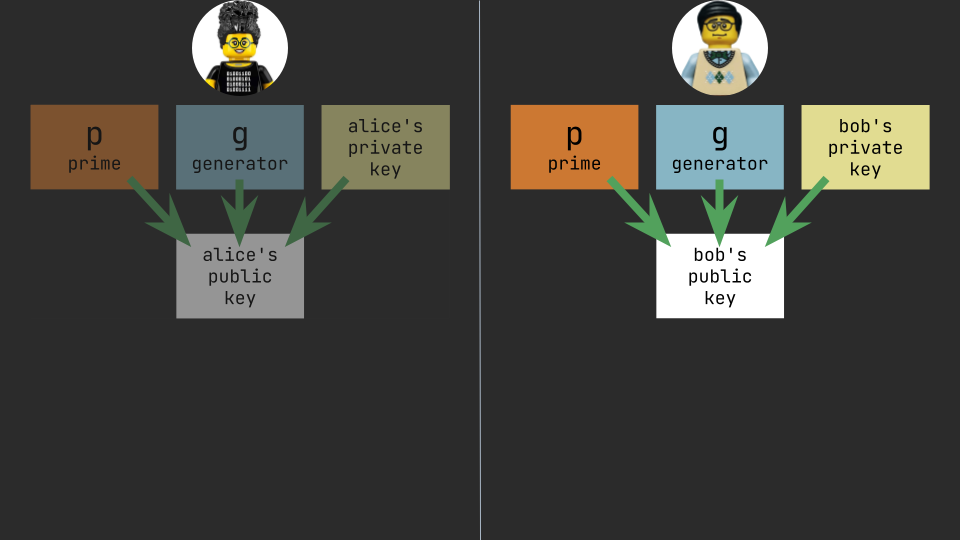
- Alice computes her public key
alicePublicKeyusing:p: A large random prime numberg: A (small) number- Alice's private key: A random number
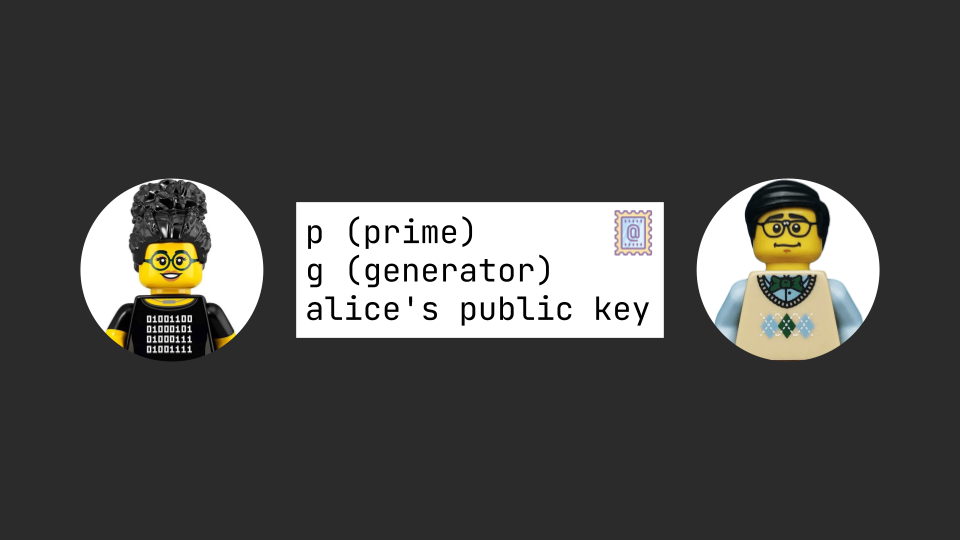
- Alice sends
p,g, andalicePublicKeyto Bob - Bob computes his pubic key
bobPublicKeyin the same way using the samepandgand a different private key of his choosing - Bob computes the shared key
secretKeyusing his private key and Alice's public key - Bob sends Alice his public key
- Alice computes the same shared key using her private key and Bob's public key
Use this slide component to see this process visualized:
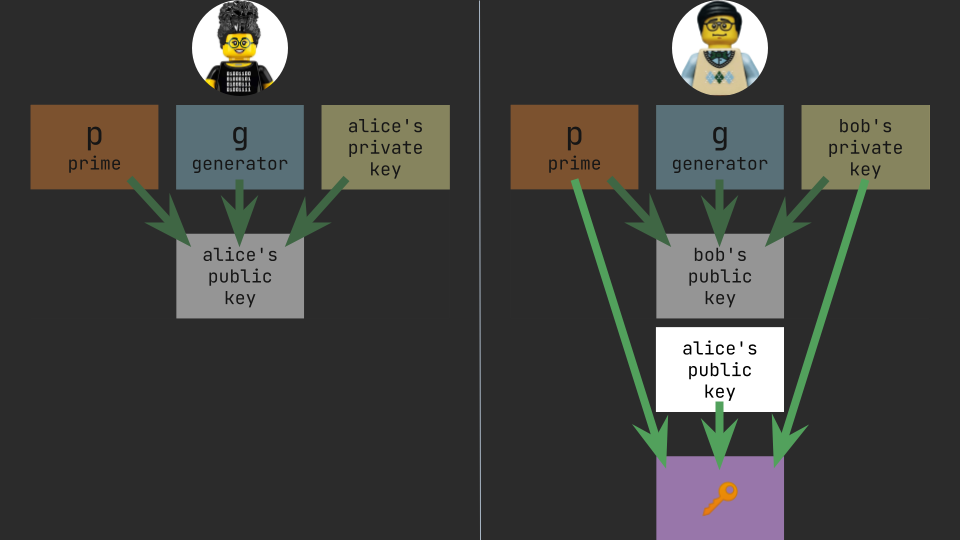

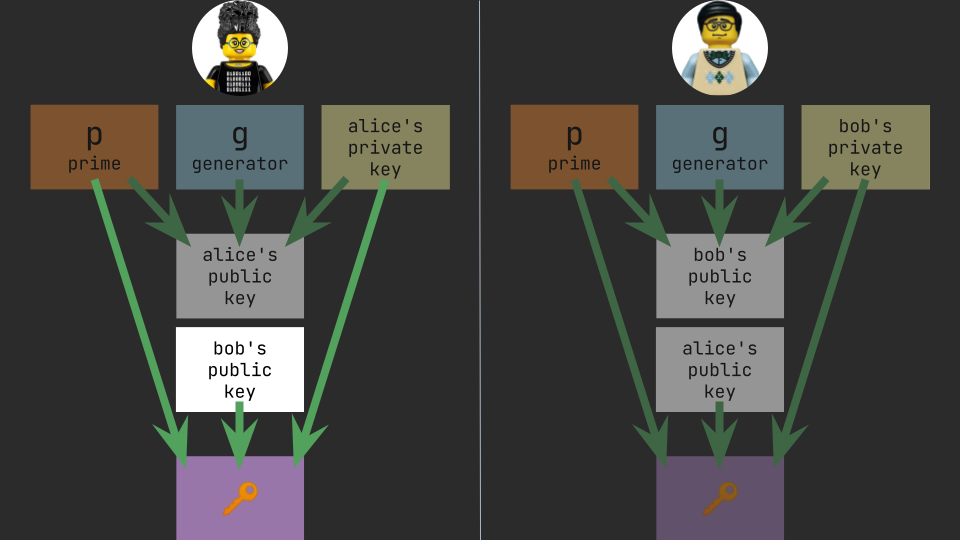
So now Alice and Bob can use this shared key for their correspondence, and Eve is none the wiser 😌
Diffie-Hellman with the crypto module
Here's Alice's code for her parts of the key exchange
(fun fact: createDiffieHellman(2048) takes 20 seconds to run on my machine!)
import { createDiffieHellman } from "crypto";

// return a DiffieHellman key exchange object
// (generate a prime number with a length of 2048 bits)
const alice = createDiffieHellman(2048);

// get the random prime used
const prime = alice.getPrime();

// get the random generator used
const generator = alice.getGenerator();

// generate both keys and return the public key
const alicePublicKey = alice.generateKeys();

function receive(bobPublicKey) {
  const secretKey = alice.computeSecret(bobPublicKey);
}
And here's Bob's
import { createDiffieHellman } from "crypto";

function receive(prime, generator, alicePublicKey) {
  // return a DiffieHellman key exchange object
  // using the same prime and generator used by Alice
  const bob = createDiffieHellman(prime, generator);

  // generate both keys and return the public key
  const bobPublicKey = bob.generateKeys();

  const secretKey = bob.computeSecret(alicePublicKey);
}
The crypto module also exposes the ECDH class which implements another important Diffie-Hellman algorithm called Elliptic Curve Diffie-Hellman (ECDH).
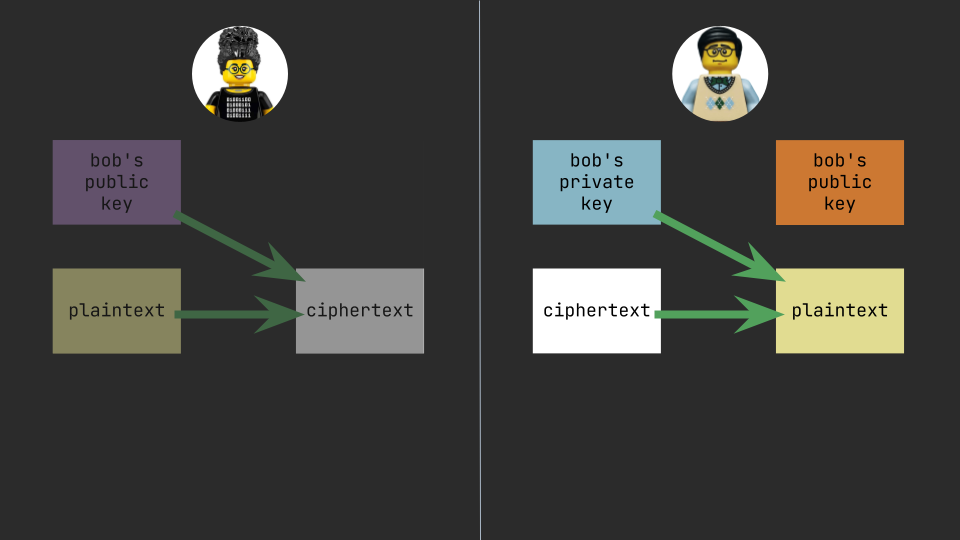
The RSA Method
Diffie-Hellman's solution to the Key Distribution Problem is remarkable, but has some limitations. Alice and Bob have to go through the rigmarole of of the key exchange before they either party can send an encrypted message. When using the RSA method, if Alice wants to send Bob an encrypted message for the first time, there's no need to exchange keys. Instead, Alice can just encrypt a message and send it to Bob to decrypt. This becomes possible by using a different key for encryption than for decryption (which is why it's referred to as asymmetric encryption). This video explores the reasoning and some of the math behind the RSA method.
Here's an overview of the Encryption \ Decryption process with RSA:
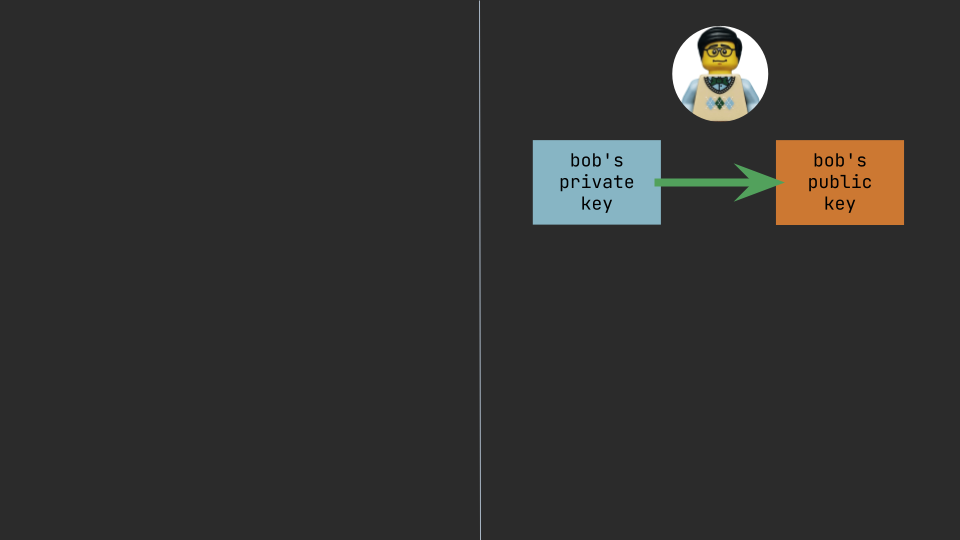
- Bob generates two different keys
- A private key
- A public key (derived from the private key)
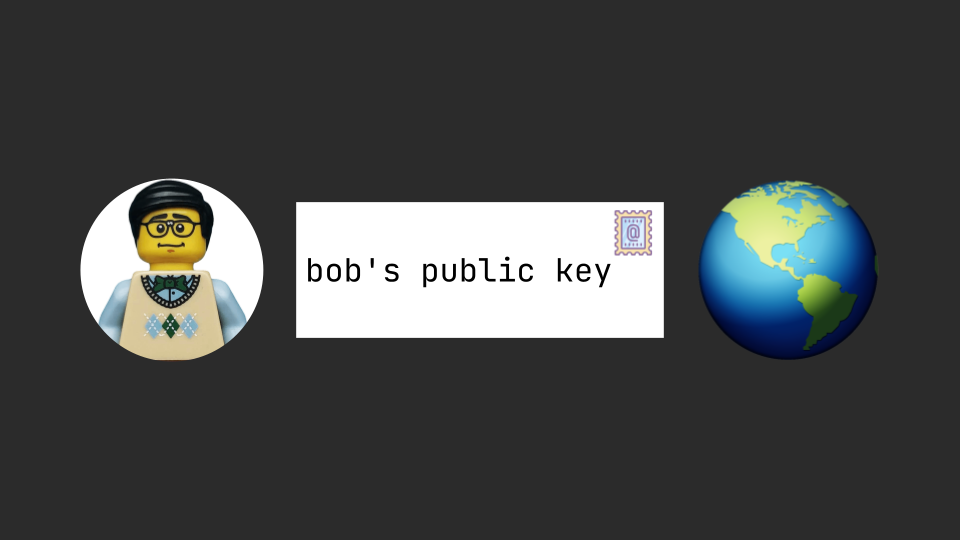
- Bob shares his public key with the world
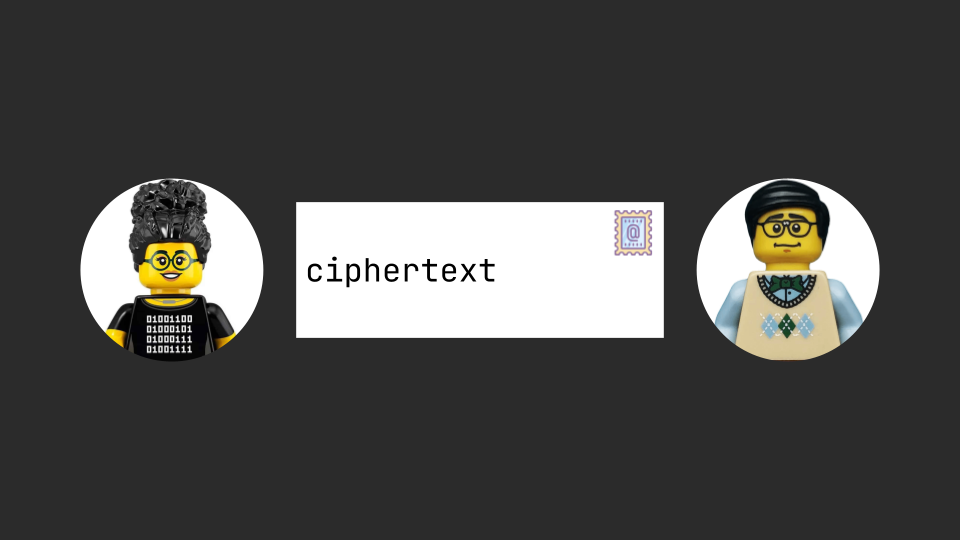
Notice that this key can be used by anyone who wants to send Bob an encrypted message. There's no need for Bob to generate different public keys for different parties. - Alice uses Bob's public key to encrypt her message
- Alice sends the encrypted message to Bob
- Bob can decrypt Alice's message using his private key
Use this slide component to see this process visualized:

RSA with the crypto module
First, Bob creates his key pair (public and private keys). He can do this only once, and can use it to communicate with everyone, not just Alice. In this code sample both keys are saved to disk, but in a real-world scenario Bob must share his public key somehow.
import crypto from "crypto";
import util from "util";
import { writeFile } from "fs/promises";

const generateKeyPair = util.promisify(crypto.generateKeyPair);

const keyPair = await generateKeyPair("rsa", {
  modulusLength: 4096,
});

const publicKey = keyPair.publicKey.export({
  type: "spki",
  format: "pem",
});
await writeFile("bob-public.pem", publicKey);

const privateKey = keyPair.privateKey.export({
  type: "pkcs8",
  format: "pem",
});
await writeFile("bob-private.pem", privateKey);
Here's Alice's encryption code which uses Bob's public key
import crypto from "crypto";
import { readFile } from "fs/promises";

const { RSA_PKCS1_OAEP_PADDING } = crypto.constants;

const bobPublicKey = crypto.createPublicKey(
  await readFile("bob-public.pem")
);

const plaintext = Buffer.from("Hello world!", "utf8");

const ciphertext = crypto.publicEncrypt(
  {
    key: bobPublicKey,
    padding: RSA_PKCS1_OAEP_PADDING,
  },
  plaintext
);
And here's Bob's decryption code which uses Bob's private key
import crypto from "crypto";
import { readFile } from "fs/promises";

const { RSA_PKCS1_OAEP_PADDING } = crypto.constants;

async function receive(ciphertext) {
  const bobPrivateKey = crypto.createPrivateKey(
    await readFile("bob-private.pem")
  );

  const plaintext = crypto.privateDecrypt(
    {
      key: bobPrivateKey,
      padding: RSA_PKCS1_OAEP_PADDING,
    },
    ciphertext
  );

  console.log(plaintext.toString("utf8"));
  // Hello world!
}
Signing and Verification ✍️
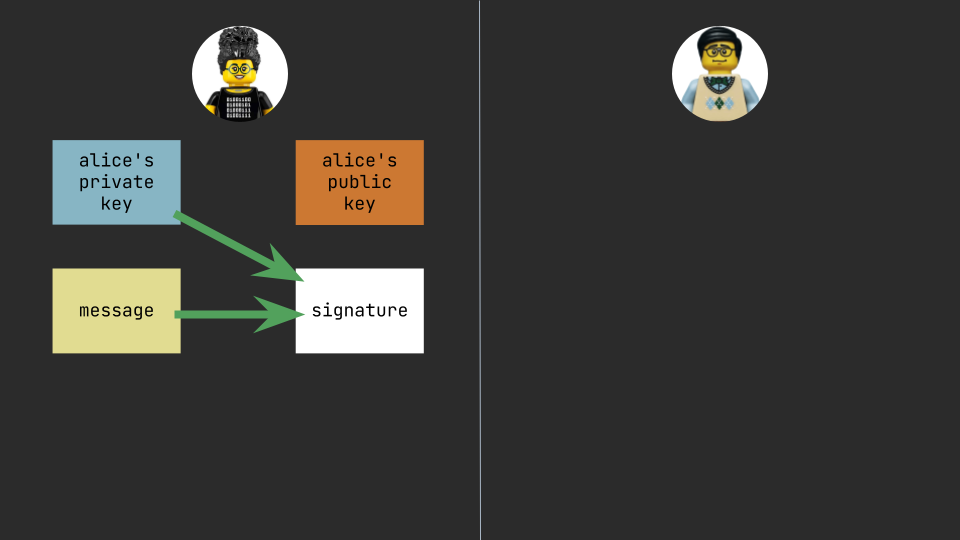
Consider this scenario: Alice is an acclaimed Cryptography expert. Bob asks her to recommend a good introductory post about Cryptography. He receives a message from her recommending some blog (the message doesn't necessarily have to be encrypted if it's not sensitive information). Bob wants to be able to verify the message came from Alice. Otherwise it's possible that Eve intercepted the message and altered its content. This is where signing and verifying comes in.

To put Bob at ease, Alice can create a cryptographic signature of her original message. Bob can then cryptographically verify that the signature is authentic. This process requires using Alice's asymmetric keys. Let's see how:
- Alice computes a signature value using
- Her private key
- The message itself
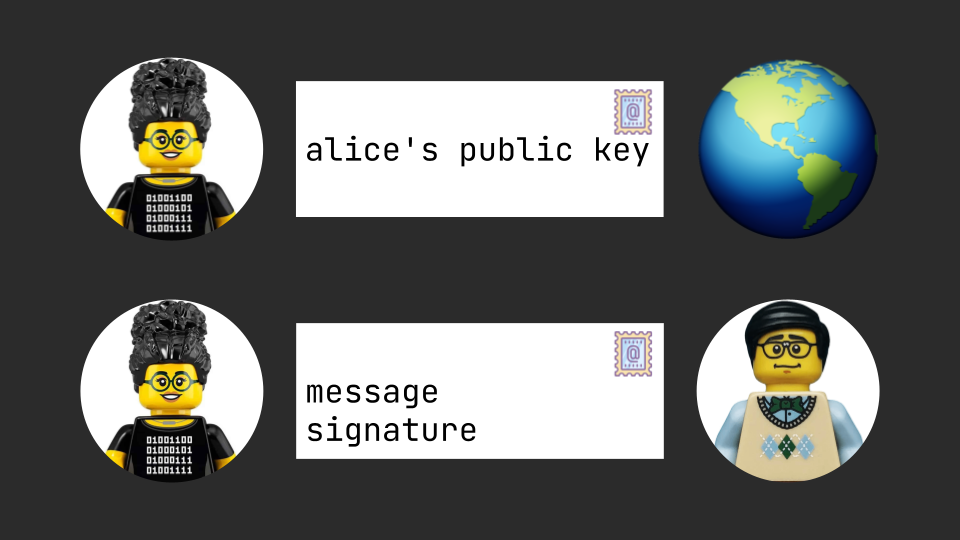
- Alice sends Bob the message and the signature value
(Bob has access to Alice's public key since it's published for all) - Bob is able to check if the signature is valid using
- The signature
- The message
- Alice's public key
Use this slide component to see this process visualized:
Signing and Verification with the crypto module
Here's Alice's code for calculating the signature using her private key.
Notice that we need to supply a hash function to use as part of the signing process (we're using sha256 in this case).
import crypto from "crypto";
import { readFile } from "fs/promises";

const alicePrivateKey = crypto.createPrivateKey(
  await readFile("alice-private.pem")
);

const message = Buffer.from("blog.yonatan.dev", "utf8");

const signature = crypto.sign(
  "sha256",
  message,
  {
    key: alicePrivateKey,
  }
);
And here's Bob's code for verifying the signature using Alice's public key
import crypto from "crypto";
import { readFile } from "fs/promises";

async function receive(message, signature) {
  const alicePublicKey = crypto.createPublicKey(
    await readFile("alice-public.pem")
  );

  const isVerified = crypto.verify(
    "sha256",
    message,
    {
      key: alicePublicKey,
    },
    signature
  );

  console.log(isVerified);
  // true
}
The crypto module also exposes the Hmac (Hash-Based Message Authentication Code) class, which offers a different approach to authenticating and verifying data.
Public Key Certificates 🪪
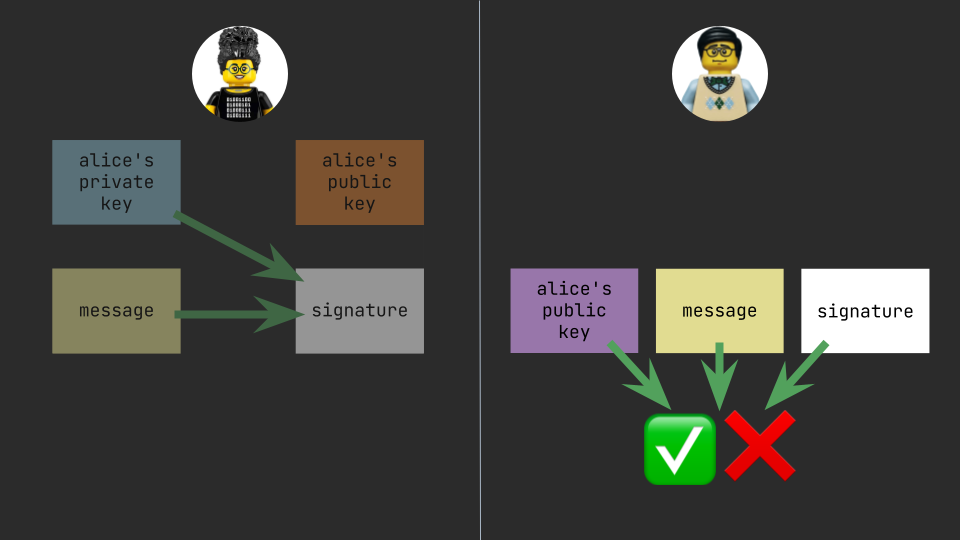
Let's re-examine the signing and verification example from the previous section. Did this process really help Bob know for certain that the message really came from Alice? Not really. All he knows for sure is that it was definitely signed by someone with access to the private key that matches the public key that Bob associates with Alice. How can we know for sure that a particular pubic key really belongs to a specific entity? This is where Public Key Certificates come in.
Detour: Let's talk about certificates
Let's put aside Cryptography and consider the concept and characteristics of certificates in general, like this one for example:

Apparently this certificate was created to provide evidence that the blog post you're reading is "the best blog post about Cryptography on the internet". To support this assertion, the certificate is signed by Alan Turing (one of the world's most celebrated cryptographers) who evidently made this claim.
These characteristics are common to this certificate and most others:
- The content the certificate establishes a claim over
e.g. "the best blog post about Cryptography on the internet" - The subject
e.g.blog.yonatan.dev - The issuer
e.g. Alan Turing - Issuer verification through a signature
e.g. Alan Turing's signature
Public Key Certificates are very similar to this. They provide evidence that a public key belongs to a particular subject. To support that claim, they are signed by the issuer. But unlike the fake certificate above, the validity of digital Public Key Certificates can (and should) be verified.
Issuing and Verifying Public Key Certificates
If Alice wants to create a certificate that will satisfy Bob, two requirements must be met:
- She must convince an issuer that Bob already trusts to vouch for her.
- The issuer must add their cryptographic signature to the certificate.
Similarly, if Bob wants to trust Alice's Public Key Certificate, two requirements must be met:
- He must trust the issuer of Alice's certificate.
- He must cryptographically verify the signature on the certificate using the issuer's public key.
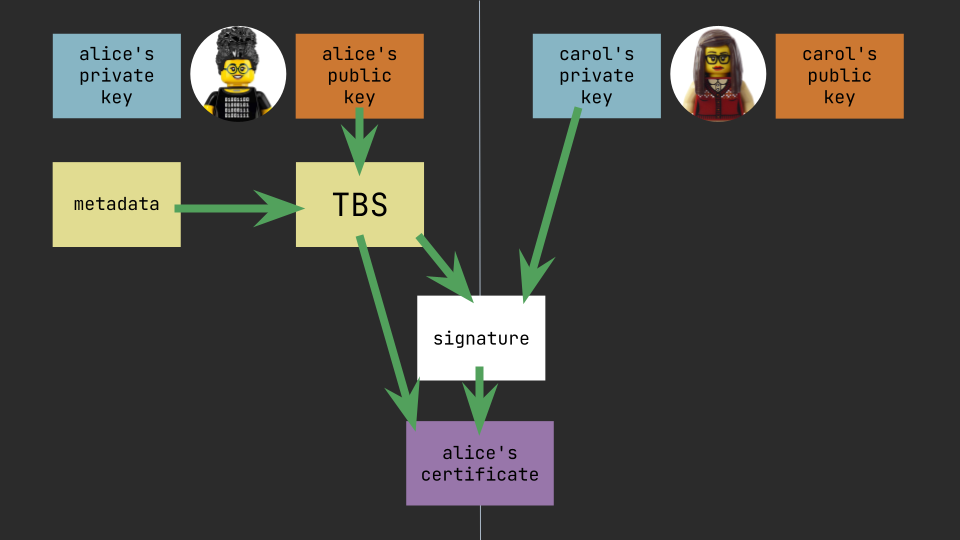
Let's assume that Alice and Bob both know Carol, who is Alice's friend and Bob's sister.
To create her certificate Alice takes her public key and some other metadata about herself (name, country, etc.), and creates a Certificate Signing Request (CSR). Carol the issuer reviews this request and agrees to vouch for Alice. So using her private key Carol creates a cryptographic signature of the "To Be Signed" (TBS) data that is contained within the request. The signature is added to the published certificate.
On Bob's side, in order to verify the certificate, he extracts the signature from the certificate and cryptographically verifies that it matches the rest of the information in the certificate.
Use this slide component to see this process visualized:

Verifying Public Key Certificates with the crypto module
In order to read certificates we use the X509Certificate class (this refers to X.509 which is the standard that defines the format of these certificates). We can check the metadata on the certificate like the subject, issuer, and when it's set to expire. And crucially we can verify the certificate using the certificate of the issuer.
Here is the code Bob uses to verify Alice's certificate using Carol's certificate (which he already trusts)
import { X509Certificate } from "crypto";
import { readFile } from "fs/promises";

const aliceCert = new X509Certificate(await readFile("alice.cer"));

console.log(aliceCert.subject);
// CN=alice (Common Name=alice)

console.log(aliceCert.issuer);
// CN=carol (Common Name=carol)

console.log(`${aliceCert.validFrom} - ${aliceCert.validTo}`);
// May  2 19:00:13 2023 GMT - Jul 31 19:00:12 2024 GMT

const carolCert = new X509Certificate(await readFile("carol.cer"));

const isVerified = aliceCert.verify(carolCert.publicKey);

console.log(isVerified);
// true
The Certificate Chain
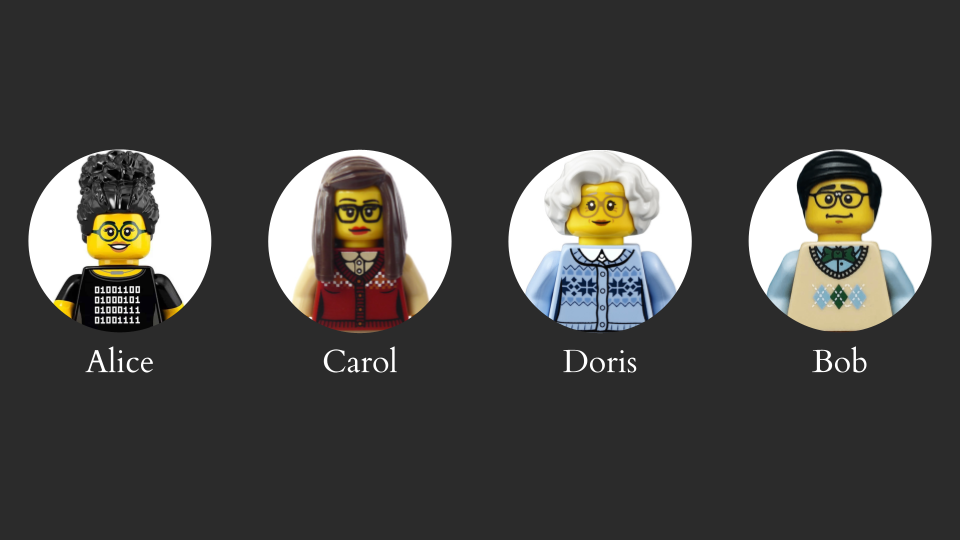
Now it's clear how Bob can trust that he's really talking to Alice. But since it all hinges on Bob trusting Carol, it bears asking: how did Bob come to trust Carol initially? Of course this is where Doris, Bob and Carol's mom, enters the picture.
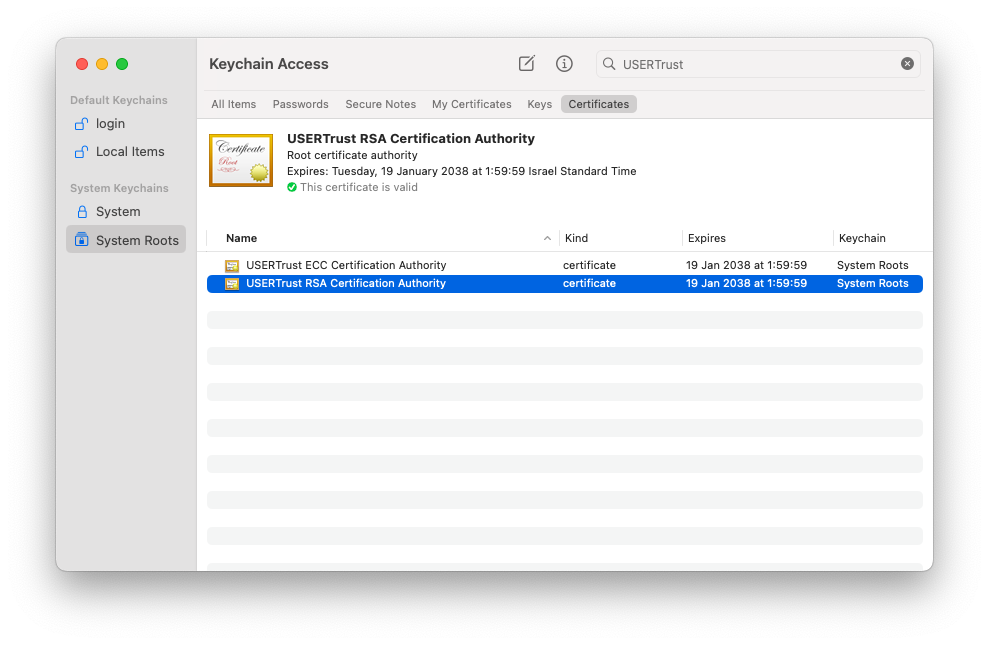
What this tries to illustrate is that there's no magic formula to establishing trust with a new certificate. It always depends on knowing and trusting a different certificate. This means to trust a new certificate, you need to establish trust with a different certificate, which means following up with a different certificate, etc. This hierarchy is referred to as a certificate chain. When reviewing a Web site's certificate in your browser, you can inspect the entire certificate chain.

At the root of the certificate chain is a certificate that can't be verified by another certificate. This top-most certificate is called the root certificate. The reason your browser typically trusts this certificate is because its baked into your operating system.
Conclusion
Hopefully this post helped you get a better understanding of Cryptography and the role it plays in our online world. All the code samples from this post are expanded upon in this github repo which includes code you can actually run.
Congrats on making it through the post! To commemorate this accomplishment, I would like to present with your own personalized diploma (including a scannable cryptographic signature of course 🤓). Click here to generate it:
If you feel like showing off your generated certificate, and\or share your feedback about this post, I would love to hear from you on Twitter or LinkedIn.


